Handsontable の再描画メソッド

Handsontable の再描画メソッドは、
インスタンスのメソッド render() で、できると思ってましたが、
うまくいかず再描画されません。

loadData( array )

を使うと再描画されます。

dataSchema を使うケース、、、

var hot = new Handsontable(document.getElementById("table"), {
    data: [],
    columns:[
        { data: 'A', type: 'text' },
        { data: 'B', type: 'numeric' },
        { data: 'C', type: 'text' },
    ],
    dataSchema: { A:null, B:null, C:null },
    colHeaders: ["A", "B", "C" ],
    renderAllRows: true,
    copyPaste: true,
    autoColumnSize: true,
    licenseKey: 'non-commercial-and-evaluation',
});
// クリックで任意のデータセットして再描画
$('#load').click(function(){
    var a = new Array();
    var m = {};
    m['A'] = "Apple";
    m['B'] = 24;
    m['C'] = "あいう";
    a.push(m);
    hot.loadData(a);
});

dataSchema を使わないケース、、、

var hot = new Handsontable(document.getElementById("table"), {
    data: [],
    columns:[
        {  type: 'text' },
        {  type: 'numeric' },
        {  type: 'text' },
    ],
    colHeaders: ["A", "B", "C" ],
    renderAllRows: true,
    copyPaste: true,
    autoColumnSize: true,
    licenseKey: 'non-commercial-and-evaluation',
});
// クリックで任意のデータセットして再描画
$('#load').click(function(){
    var a = new Array();
    var d = new Array();
    d.push("Apple");
    d.push(24);
    d.push("あいう");
    a.push(d);
    hot.loadData(a);
});

Handsontableの dropMenu 及び、条件フィルタメニューの日本語化

Handsontableの dropMenu 及び、条件フィルタは、バージョン 7.0.0 以降から利用可能で
かなり Excel 同様の条件フィルタに操作性が近づいている。
Handsontable インスタンス生成のオプションで、filters: truedropdownMenu: true を付与する。
バージョン 7 以降、無償版として使うには、
 licenseKey: 'non-commercial-and-evaluation'
をオプションとして記述も必要

var data = [
   [ 'Apple', 180, '2021/08/15' ],
   [ 'Lemon',  80, '2021/07/09' ],
   [ 'kiwi',  90, '2021/08/31' ],
   [ 'Fish',  260, '2021/07/30' ],
   [ 'banana',  320, '2021/08/21' ],
   [ 'Meron',  520, '2021/08/24' ],
];
var hot = new Handsontable(document.getElementById("table"), {
   data: data,
   columns:[
      { type: 'text' },
      { type: 'numeric' },
      { type: 'date', dateFormat: 'YYYY/MM/DD' },
   ],
   colHeaders: ["A", "B", "C" ],
   copyPaste: true,
   autoColumnSize: true,
   filters: true,
   dropdownMenu: true,
   licenseKey: 'non-commercial-and-evaluation',
});

でも、このままでは、英語のままである。
f:id:posturan:20210815135643j:plain

ドキュメント:Column filter - Guide - Handsontable Documentation
のとおり、
dropdownMenu: true, を以下のように

     dropdownMenu: ['filter_by_condition', 'filter_action_bar'],

とすることで、
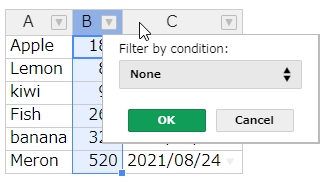
f:id:posturan:20210815141429j:plain
条件フィルタだけにはなる。
本題:これらメニュー表示を日本語化する
Handsontable 配布をダウンロードして同梱されている言語パックを適用する。
配布物の中に、languages というフォルダがあるはずだ。
その中に、日本語用に、
  ja_JP.js
または、
  ja_JP.min.js
があるので、ja_JP.min.js 読むようにする。
インスタンス生成のオプションで、language: を指定する。

var hot = new Handsontable(document.getElementById("table"), {
   data: data,
   language: 'ja-JP',

すると、、日付のセルでは、、
f:id:posturan:20210815141101j:plain
この条件のプルダウンは、、、
f:id:posturan:20210815141138j:plain

数値のセルでは、、、
f:id:posturan:20210815141216j:plain
f:id:posturan:20210815141236j:plain

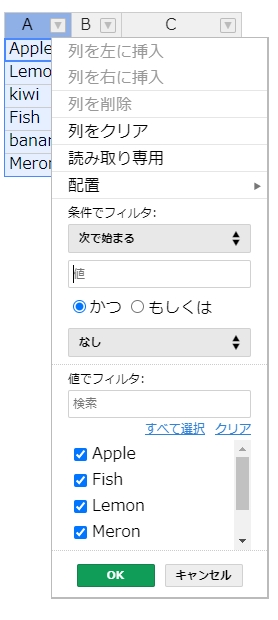
文字列のセルでは、、、
f:id:posturan:20210815141701j:plain
f:id:posturan:20210815141818j:plain
ANDも指定できる
f:id:posturan:20210815141926j:plain

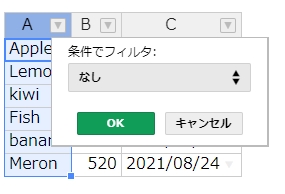
 dropdownMenu: ['filter_by_condition', 'filter_action_bar'], 
だけにした場合は、、、
f:id:posturan:20210815140206j:plain
を表示する。

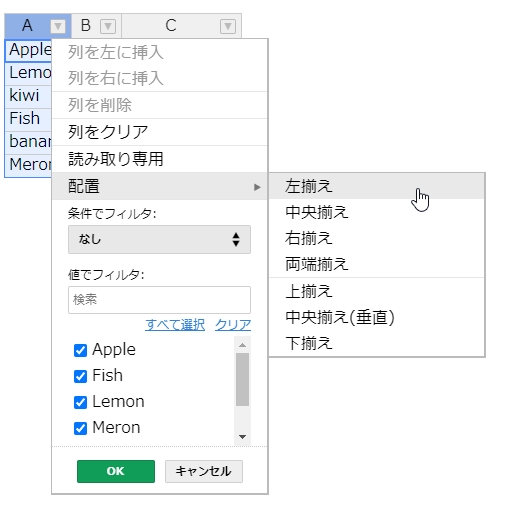
    dropdownMenu: ['filter_by_condition', 'filter_by_value', 'filter_action_bar'],

にした時は、、
f:id:posturan:20210816223657j:plain

Handsontable セルに配置するリンク

ボタンを配置するときと同様に、HtmlRenderer を使うのだが。。。
グリッドデータJSON に、URLを持って表示させる場合は、renderer の指定に、"html" を指定する。
で良かった。

var data = [
   { link:'<a href="http://google.co.jp">google</a>' }
];
var hot = new Handsontable(document.getElementById("table"), {
   data: data,
   columns:[
      {  data:'link',
         readOnly: true,
         renderer: 'html',
      },
   // 省略

しかし、編集可能な表で、動的にリンクの行の他のセルの値をURLパラメータにする場合は、
renderer の指定は、グリッド描画時に、URLを書き直す必要があり、以下のようにする。

var hot = new Handsontable(document.getElementById("table"), {
   data: data,
   columns:[
      {  data:'link',
         readOnly: true,
         renderer: function(instance, td, row, col, prop, value, cellProperties) {
            Handsontable.renderers.HtmlRenderer.apply(this, arguments);
            // 列先頭の値をリンクパラメータに付与
            var colvalue = instance.getData(row, 0)[0][0];
            $(td).empty().append('<a href="/targetPage?row=' + row
                                              + '&col_0_value=' + colvalue 
                                              +  '">' + value + '</a>');
         },
      },
   // 省略

このURLパラメータで指定するセルの値も、
編集した後に再度この renderer の function() が実行されて、instance より、
instance.getData(row, column) で取得する2次元配列でパラメータとして
付与したい値を取得して、リンクを描画するのである。

あるいは、以下の方が正しい方法かもしれない。

var hot = new Handsontable(document.getElementById("table"), {
   data: data,
   columns:[
      {  data:'link',
         readOnly: true,
         renderer: function(instance, td, row, col, prop, value, cellProperties) {
            var colvalue = instance.getData(row, 0)[0][0];
            var linkValue = '<a href="/targetPage?row=' + row + '&col_0_value=' + colvalue +  '">' + value + '</a>';
            Handsontable.renderers.HtmlRenderer.apply(this, [instance, td, row, col, prop, linkValue, cellProperties]);
         },
      },
   // 省略

Handsontable に配置するボタンのサンプル

先日書いた、
oboe2uran.hatenablog.com
このサンプル、押下したボタンの特定方法が良くない!
Class属性ではなくて、ちゃんとボタンタグに割り当てる id で、特定させるべきで、
HTMLRenderer で生成時に、列番号を付与したIDにしておくべきだ。

var hot = new Handsontable(document.getElementById("table"), {
   data: data,
   columns:[
      {  data:'A', type: 'text' },
      {  data:'B', type: 'text' },
      {  data:'C',
         readOnly: true,
         width: 100,
         renderer: function(instance, td, row, col, prop, value, cellProperties){
            var button = $('<button id="btn_' + col + '">');
            button.html("実行");
            $(td).addClass("htCenter");
            $(td).addClass("htMiddle");
            $(td).empty().append(button);
            td.style.background = "#f0f0f0";
         },
      },
   ],
   colHeaders: ["A", "B", "C" ],
   dataSchema: { A:null, B:null, C:null },
   copyPaste: true,
   autoColumnSize: true,
   manualColumnResize: true,
   maxRows: 10,
   maxCols: 7,
   afterOnCellMouseDown: function(event, cords, TD) {
      if (event.toElement.tagName=="BUTTON"){
         if ($(event.toElement).prop("id").match(/^btn_[0-9]+$/)){
            console.log(event.toElement);
            console.log("# row = "+ cords.row + "  col = " + cords.col);
            var ary = hot.getDataAtRow(cords.row);
            console.log(ary);
         }
      }
   },
   contextMenu: {
      items:{
         'row_above': { name: '1行挿入' },
         'remove_row': { name: '1行削除', disabled: function(){ return hot.countRows() < 2; }  },
         "hsep": "---------",
         'undo': { name: '戻る' },
      },
   },
});

$(event.toElement).prop("id") で取得した id 値を正規表現で確認すれば良い。
⇒ .match(/^btn_[0-9]+$/)

IPアドレスの正規表現

IPv4正規表現

^([1-9]?[0-9]|1[0-9]{2}|2[0-4][0-9]|25[0-5])\.([1-9]?[0-9]|1[0-9]{2}|2[0-4][0-9]|25[0-5])\.([1-9]?[0-9]|1[0-9]{2}|2[0-4][0-9]|25[0-5])\.([1-9]?[0-9]|1[0-9]{2}|2[0-4][0-9]|25[0-5])$


↑↑↑↑↑↑
長くてこのページでは隠れてしまっているかもしれません。

0~255 だけ、1部分は、、
([1-9]?[0-9]|1[0-9]{2}|2[0-4][0-9]|25[0-5])
です。
これを、"\."で連結すれば良いわけです

Handsontable セルに配置したボタンのイベント

Handsontable で、セル内に配置したボタン押下にイベントから押された対象を参照するのは、
 event.realTarget だと思っていたが、
Ver 8.0.0 以降では、この名称ではなく、 event.toElement であった。
以下のようにする。
カラム定義で 指定する Renderer を書いておく。

var action01Renderer = function(instance, td, row, col, prop, value, cellProperties) {
    var button = $('<button class="action01">');
    button.html("実行");
    $(td).addClass("htCenter");
    $(td).addClass("htMiddle");
    $(td).empty().append(button);
    td.style.background = "#f0f0f0";
};

カラム定義

var hot = new Handsontable(document.getElementById("table"), {
    data: data,
    columns:[
        {    readOnly: true,
            renderer: action01Renderer,
        },
    ],

セル上のマウス down イベントのフック、afterOnCellMouseDown を記述する

var hot = new Handsontable(document.getElementById("table"), {
    data: data,
    columns:[
        {    readOnly: true,
            renderer: action01Renderer,
        },
    ],

    afterOnCellMouseDown: function(event, cords, TD) {
        if (event.toElement.tagName=="BUTTON"){
            if (event.toElement.className.indexOf("action01") >= 0){
                // cords.row =行インデックス
                // cords.col =列インデックス
                // ボタン押下した行のデータを取得(配列)
                var ary = hot.getDataAtRow(cords.row);
                console.log(ary);
            }
        }
    },

event.toElement.tagName が、"BUTTON" であるか問い合わせることで、
確実にボタン押下を拾う。
event.toElement.className を確認することで、他のセルに配置したボタンとも
区別する。⇒最初の ボタン Renderer で定義する ClassName で識別できるようにすること
ミソである。

ボタン押下した行のデータを取得(配列)は、

     hot.getData(cords.row, 0, cords.row, hot.countCols());

でも、同様に取得はできるが、2次元配列として取得してしまうので、
getDataAtRow の方が使いやすい

サンプルとしては、以下のように書き直した。。。
Handsontable に配置するボタンのサンプル - Oboe吹きプログラマの黙示録

clockpicker で、時(Hour)だけの入力にする

ClockPicker で、時(Hour)だけの入力にする方法、
つまり、時(Hour)の選択後、分(minute)を選択する表示をせずに、入力を終わらせて
hh:00 が入力結果になるようにする方法
Option で、afterHourSelect のイベント捕捉の処理を書き、
  data('clockpicker').done()
で入力を強制的に終わらせる。

var targetInput = $('timeinput');
var cp = targetInput.clockpicker({
    autoclose: true,
    afterDone: function(){
        // +1 hour の時:分
        var hour = parseInt(targetInput.val().split(":")[0], 10);
        var next = hour==23 ? 0 : hour + 1;
        var nexttime = ("0" + next).slice(-2) + ":00";
        console.log(nexttime);
    },
    afterHourSelect: function(){
        cp.data('clockpicker').done();
    }
});
<div>
    <input id="timeinput" type="text">
</div>