編集可能にしたTabulator で、ALL check のチェックBOXを設置する

Tabulator は、編集用に設置した場合、
チェック(tickcross)に対する、ALL check ON/OFF を切り替える=入力する為の
機能または部品というのは標準で用意されていない。
ALL check ON/OFF の部品は、普通のUI感覚では、表のヘッダにある。
しかし、Tabulator のヘッダカラム定義でそこに設置するのは、
表示フィルタでありALL check ON/OFF ではない。
では、どうするか?
トリッキーな方法をするしかない。
Tabulator のフィルタは、カスタムフィルタを指定できることになっている。
まず、、チェック(tickcross) に対してフィルタではなく全てをセットする。
・・・この時点、ONにする設定だけで、後でOFFにする処理は別である。
そして、このヘッダの定義で、headerFilterPlaceholder を敢えて設定しておく、

var columndefine = [
   {  field:"active", editor:"tick", align:"center", formatter: "tickCross",
      headerFilter: true, width: 40,
      headerFilterPlaceholder:"Allcheck",
      headerFilterFunc:function(headerValue, rowValue, rowData, filterParams){
            rowData.active = 1;
            return true;
         }
      },
      { title:"名前",  field:"name",   editor:"input", sortable:true, headerFilter:false } ,
];

rowData のデータをフィルタのチェックで、全てON(=1)をセットしてフィルタを
働かせてしまうのだ。これは、フィルタ関数の実行が各行に対して実行されるから、
成立する。

全てOFFは、この後で、jQuery の click イベント捕捉の関数定義で処理する。

Tabulator データ定義と設置

$('#example-table').tabulator({
   layout: "fitDataFill",
   columns: columndefine,
});
var tabledata = [
   {id:1, active: 1, name:"あああ" },
   {id:2, active: 0, name:"いいい" },
   {id:3, active: 1, name:"ううう" },
   {id:4, active: 0, name:"ABCDE"  },
   {id:5, active: 1, name:"12345"  },
];

// load sample data into the table
$("#example-table").tabulator("setData", tabledata);

placeholder='Allcheck' の input を click した時の設定関数を定義する

var setAllchecker = function(){
   $("input[placeholder='Allcheck']").click(function(){
      if (!$(this).prop('checked')){
         var res = [];
         $.each($("#example-table").tabulator("getData"), function(i, row){
            row.active = 0;
            res.push(row);
         });
         $("#example-table").tabulator("destroy");
         $('#example-table').tabulator({
            layout: "fitDataFill",
            columns: columndefine,
         });
         $("#example-table").tabulator("setData", res);
         setAllchecker();
      }
   });
};

この中では、destroy して再表示させているので、もう一度、setAllchecker() を呼び出して
再定義が必要になる。
最後に、setAllchecker() を実行

// setAllchecker() を実行
setAllchecker();

jsTree JSON データの変換

ツリービューの情報を管理するのに、ノードの親子関係の処理を新たにコーディングするのは、どんな言語であれ
労力が必要です。
できれば、画面でツリーの描画操作の結果をそのまま管理するのが楽です。
せっかく JSON というオブジェクトで表現するのですから、このJSONの考えで管理したいです。

jsTree 使用のコード上で!JSONを出力させる方法は、、get_jsonを実行することです。

.on('loaded.jstree', function(){
  var v = $(this).jstree(true).get_json('#', {flat:true});
  console.log( JSON.stringify(v, null, " ") );
});

でもここで出力されるのは、、jSTree を呼ぶ時に書いたそのままのJSONではないです。

[
 {
  "id": "1",
  "text": "Root",
  "icon": "jstree-folder",
  "li_attr": {
   "id": "1"
  },
  "a_attr": {
   "href": "#",
   "id": "1_anchor"
  },
  "state": {
   "loaded": true,
   "opened": true,
   "selected": false,
   "disabled": false
  },
  "data": {},
  "parent": "#"
 },
 {
   "id":"2"

この中で改めて再度jQueryでjsTree()を呼び出し、描画で必要な情報は、
"id", "text", "icon", "parent", と "state" の各boolean値です。
stateは最初表示し直すならもしかして要らないかもしれません。
そうすると、check_callback や、move_node.jstree のイベント捕捉で、
HTML-form の input type="hidden" フィールドにセットして
送信してあげれば、
 「ツリーの編集結果」→ サーバに送信
ということができるわけです。

(例)
input type="hidden" フィールドにセットを関数にしておきます。

var setHiddenJson = function(){
   var v = $('#tree').jstree(true).get_json('#', {flat:true});
   $("#jsondata").val(JSON.stringify(v));
};

check_callback のリネーム、削除の捕捉では setTimeout でcallする必要があります

"check_callback" : function(operation, node, node_parent, node_position, more){
   if (operation=="move_node"){
      if (node_parent.icon != "jstree-folder" && node_parent.id != "#") return false;
   }
   if (operation=="rename_node" || operation=="delete_node"){
      setTimeout("setHiddenJson()", 100);
   }
}

ドラッグ&ドロップ時はそのまま呼出します。

.on('move_node.jstree', function(e, data){
  setHiddenJson();
})

受け取りサーバでの管理、Java前提ですが、、
受信テキストJSONGoogle Gson で任意オブジェクトに変換します。
→ 以下、JstreeNode です。

public class JstreeNode implements Serializable{
   public String id;
   public String text;
   public String icon;
   public String parent;
   public Object state;
   public boolean loaded;
   public boolean opened;
   public boolean selected;
   public boolean disabled;

   public JstreeNode(){
   }
    // setter を用意します。getterメソッド は不要

肝になるのは、JSON → 任意オブジェクトのアダプタです。
デシリアライザが必要でシリアライザは不要なのですが、ついでなので書きます。

import java.lang.reflect.Type;
import java.util.HashMap;
import com.google.gson.JsonDeserializationContext;
import com.google.gson.JsonDeserializer;
import com.google.gson.JsonElement;
import com.google.gson.JsonObject;
import com.google.gson.JsonParseException;
import com.google.gson.JsonSerializationContext;
import com.google.gson.JsonSerializer;
/**
 * JstreeNodeAdapter
 */
public class JstreeNodeAdapter implements JsonDeserializer<JstreeNode>
                              , JsonSerializer<JstreeNode>{
   @Override
   public JstreeNode deserialize(JsonElement json, Type typeOfT
, JsonDeserializationContext context) throws JsonParseException{
      final JsonObject jo = json.getAsJsonObject();
      JstreeNode rtn = new JstreeNode();
      rtn.id = jo.get("id").getAsString();
      rtn.text = jo.get("text").getAsString();
      rtn.icon = Optional.ofNullable(jo.get("icon")).map(e->e.getAsString()).orElse(null);
      rtn.parent = Optional.ofNullable(jo.get("parent")).map(e->e.getAsString()).orElse(null);
      final JsonObject state = jo.getAsJsonObject("state");
      if (state != null){
             rtn.loaded = Optional.ofNullable(state.getAsJsonPrimitive("loaded")).map(e->e.getAsBoolean()).orElse(true);
             rtn.opened = Optional.ofNullable(state.getAsJsonPrimitive("opened")).map(e->e.getAsBoolean()).orElse(true);
             rtn.selected = Optional.ofNullable(state.getAsJsonPrimitive("selected")).map(e->e.getAsBoolean()).orElse(false);
             rtn.disabled = Optional.ofNullable(state.getAsJsonPrimitive("disabled")).map(e->e.getAsBoolean()).orElse(false);
     }
      return rtn;
   }
   @Override
   public JsonElement serialize(JstreeNode src, Type typeOfSrc
, JsonSerializationContext context){
      final JsonObject rtn = new JsonObject();
      rtn.add("id", context.serialize(src.id));
      rtn.add("text", context.serialize(src.text));
      rtn.add("icon", context.serialize(src.icon));
      rtn.add("parent", context.serialize(src.parent));
      HashMap<String, Object> map = new HashMap<>();
      map.put("loaded", src.loaded);
      map.put("opened", src.opened);
      map.put("selected", src.selected);
      map.put("disabled", src.disabled);
      rtn.add("state", context.serialize(map));
      return rtn;
   }
}

HTML-form 受信データをこのアダプタを使って、JstreeNodeリストを組み立てます。

Gson gson = new GsonBuilder().serializeNulls()
.registerTypeAdapter(JstreeNode.class, new JstreeNodeAdapter())
.create();

List<JstreeNode> list = gson.fromJson(jsonHidden.getModelObject()
, new TypeToken<List<JstreeNode>>(){}.getType());

TypeToken は、com.google.common.reflect.TypeToken です。

画面でツリー編集したものはこれで受け取り Javaオブジェクトから好きな形に変換
するなり、管理します。

問題は、JstreeNodeリストデータ→jsTree表示で、
このjsTree表示を実行するのは、JSON受信した時とは少し異なるJSONでなければ
なりません。
しかも、jsTree は、JSONのルールチェックを厳密に行います。

「少し異なるJSON」=子ノードは、"children" キーで書かなくてはならないです。

そこで、JstreeNodeリストデータ→jsTree 表示用、AJAX で表示するデータへの変換
という処理のクラスを用意します。
誰でも書くような、簡単な再帰ロジックです。

import java.io.IOException;
import java.io.InputStream;
import java.io.InputStreamReader;
import java.io.OutputStream;
import java.io.OutputStreamWriter;
import java.io.Reader;
import java.io.Writer;
import java.nio.charset.StandardCharsets;
import java.util.List;
import java.util.stream.Collectors;
import com.google.common.reflect.TypeToken;
import com.google.gson.Gson;
import com.google.gson.GsonBuilder;
/**
 * JstreeNode のリストの InputStream から
 *  jsTree jsTree AJAX に渡す JSONデータ を OutputStream に書き込む」
 *
 * 例)
 * try(InputStream in = new FileInputStream(file);
 *      ByteArrayOutputStream out = new ByteArrayOutputStream()){
 *     JstreeDataProvider p = JstreeDataProvider.of(in);
 *     p.write(out);
 * }catch(IOException e){
 *    e.printStackTrace();
 * }
 *
 */
public final class JstreeDataProvider{
   private InputStream in;
   private Gson gson;

   public JstreeDataProvider(InputStream in){
      this.in = in;
      gson = new GsonBuilder().serializeNulls()
      .registerTypeAdapter(JstreeNode.class, new JstreeNodeAdapter())
      .create();
   }
   public static JstreeDataProvider of(InputStream in){
      return new JstreeDataProvider(in);
   }

   public void write(OutputStream out) throws IOException{
      Reader reader = new InputStreamReader(in, StandardCharsets.UTF_8);
      List<JstreeNode> list = gson.fromJson(reader, new TypeToken<List<JstreeNode>>(){}.getType());
      String result = list.stream().filter(e->e.parent.equals("#"))
      .map(root->{
         StringBuilder sb = new StringBuilder();
         sb.append("{");
sb.append("\"id\":\"" + root.id + "\",\"icon\":\"" + root.icon + "\",\"text\":\"" + root.text +"\"");
sb.append( childParse(list, list.stream()
.filter(e->e.parent.equals(root.id)).collect(Collectors.toList())) );
         sb.append("}");
         return sb.toString();
      }).collect(Collectors.joining(","));
      Writer writer = new OutputStreamWriter(out, StandardCharsets.UTF_8);
      writer.write("[");
      writer.write(result);
      writer.write("]");
      writer.flush();
   }
   private String childParse(List<JstreeNode> orglist, List<JstreeNode> clist){
      if (clist.size()==0) return "";
      StringBuilder csb = new StringBuilder();
      csb.append(",\"children\":[");
      csb.append(
         clist.stream().map(e->{
            StringBuilder sb = new StringBuilder();
            sb.append("{");
sb.append("\"id\":\"" + e.id + "\",\"icon\":\"" + e.icon + "\",\"text\":\"" + e.text +"\"");
sb.append( childParse(orglist, orglist.stream()
.filter(t->t.parent.equals(e.id)).collect(Collectors.toList())) );
            sb.append("}");
            return sb.toString();
         }).collect(Collectors.joining(","))
      );
      csb.append("]");
      return csb.toString();
   }
}

これで、
「画面でツリー編集操作」→「サーバ送信」→「JSONをJava Object に変換」→
→「DBなどに管理」→「再表示要求」→「Java Object からJSON
→「jsTreeに送る」→「再描画」
のサイクルが作れます。わざわざ、JSONを別のデータ形式にするのは、
画面の描画以外の管理情報を付与して
jsTreeが抱える画面情報の表現と別の管理情報による管理が、現実は必要だからです。
つまり、jsTreeは、あくまでも描画における最低限の描画情報を持っているだけで、
「ツリー構造の情報管理」という、大きなものまでは、範疇にできないのです。

jsTreeのドラッグアンドドロップの制御

jsTree ドラッグアンドドロッププラグイン は、
単に、dnd だけを書くと、

$('#tree').jstree({ 'core':{},
          "plugins":[  "dnd" ]
));

なんでもかんでも、どこの移動先にもドラッグアンドドロップで移動ができてしまう。
ファイルの下に、ぶら下げるような規則に反することをしない制御をする方法、、
→ check_callback : function を書けば良い。
以下、ノードのアイコンを判定し、ルートへの移動を可能にする制御を、"data" : {} の次に書く!

"check_callback" : function(operation, node, node_parent, node_position, more){
   if (operation=="move_node"){
      if (node_parent.icon != "jstree-folder" && node_parent.id != "#") return false;
   }
}

移動後のイベントを受け取って処理をするには、

$('#treediv').jstree({ 'core':{
  :
}}).on('move_node.jstree', function(e, data){
      console.log("id = " + data.node.id + "  text = " + data.node.text );
      console.log("移動前 parent id = " + data.old_parent + "  position = " + data.old_position );
      console.log("移動後 parent id = " + data.parent + "  position = " + data.position );

先頭ルートになるノードの親(parent) の id は、必ず "#" である。

jsTree のコンテキストメニューにアイコンを設定

jsTree のコンテキストメニューをカスタマイズ - Oboe吹きプログラマの黙示録
に続き、CSS疑似要素で、フォントアイコンを書く - Oboe吹きプログラマの黙示録
を書いたことを利用して、コンテキストメニューにアイコンを設定します。
今回も、Fontello - icon fonts generator を使います。
表示するアイコンのCSS、
全てのアイコンの外観は、contextmenu-icon クラスとして定義します。

@font-face{
   font-family: 'fontello';
   src: url('font/fontello.eot');
   src: url('font/fontello.eot#iefix') format('embedded-opentype'),
        url('font/fontello.woff') format('woff'),
        url('font/fontello.ttf') format('truetype'),
        url('font/fontello.svg#fontello') format('svg');
   font-weight: normal;
   font-style: normal;
}
.contextmenu-icon{
   font-family: "fontello";
   font-style: normal;
   font-weight: normal;
   font-size: 16px;
   display: inline-block;
   text-decoration: inherit;
   cursor: pointer;
   color: #0085c9;
   margin: 1px 1px;
}
/**
 * folder-plus  &#xecf2;
 */
.contextmenu-icon.folder-plus::before{ content : "\00ecf2"; }

/**
 * file-plus     &#xed2a;
 */
.contextmenu-icon.file-plus::before{ content : "\00ed2a"; }

/**
 * rename        &#xe801;
 */
.contextmenu-icon.rename-icon::before{ content : "\00e801"; }

/**
 * delete        &#xec43;
 */
.contextmenu-icon.delete-icon::before{ content : "\00ec43"; }

/**
 * Cut           &#xe88a;
 */
.contextmenu-icon.cut-icon::before{ content : "\00e88a"; }

/**
 * Copy          &#xf24d;
 */
.contextmenu-icon.copy-icon::before{ content : "\00f24d"; }

/**
 * Paste         &#xf0ea;
 */
.contextmenu-icon.paste-icon::before{ content : "\00f0ea"; }

jsTree コンテキストメニュー定義するJSの一部分です。(action など長い部分は省略)
各メニューの "icon" 属性に、contextmenu-icon と 各々アイコンの2つのクラス名を書きます。

"contextmenu":{
   "items":function($node){
      return {
         "createFolder":{
            "separator_before": false, "separator_after": false,
            "icon": "contextmenu-icon folder-plus",
            "label": "新規フォルダ作成",
            "_disabled": function(data){===(省略)=== },
            "action": function(data){ ===(省略)===  }
         },
         "createFile":{
            "separator_before": false, "separator_after": false,
            "icon": "contextmenu-icon file-plus",
            "label": "新規ファイル作成",
            "_disabled": function(data){===(省略)=== },
            "action": function(data){ ===(省略)===  }
         },
         "rename":{
            "separator_before": true, "separator_after": false,
            "icon": "contextmenu-icon rename-icon",
            "label": "名称の変更",
            "_disabled": false,
            "action": function(data){ ===(省略)===  }
         },
         "remove":{
            "separator_before": false, "separator_after": false,
            "icon": "contextmenu-icon delete-icon",
            "label": "削除",
            "_disabled": function(data){===(省略)=== },
            "action": function(data){ ===(省略)===  }
         },
         "cut":{
            "separator_before": true, "separator_after": false,
            "icon": "contextmenu-icon cut-icon",
            "label": "切り取り",
            "_disabled": function(data){===(省略)=== },
            "action": function(data){ ===(省略)===  }
         },
         "copy":{
            "separator_before": false, "separator_after": false,
            "icon": "contextmenu-icon copy-icon",
            "label": "コピー",
            "_disabled": function(data){===(省略)=== },
            "action": function(data){ ===(省略)===  }
         },
         "paste":{
            "separator_before": false, "separator_after": false,
            "icon": "contextmenu-icon paste-icon",
            "label": "貼り付け",
            "_disabled": function(data){===(省略)=== }
            "action": function(data){ ===(省略)===  }
         }
      };
   }
}

このようになります。
f:id:posturan:20180924102039j:plain

CSS疑似要素で、フォントアイコンを書く

ブラウザ表示で期待するHTML

<i class="plus-icon">&#xecf2;</i>

フォントアイコンで必要な基本的なCSSは書いてあるとする。
失敗するパターン。。。

.plus-icon::before{
   content: "&#xecf2;";
}

これはダメである
挿入する疑似要素がそのままの文字列が出てしまい、フォントアイコンにならない。
こういう特殊文字は以下のようにしなければならない。
(1) & を \(バックスラッシュ)に変更する。
(2) #とxをそれぞれ0に変更する(または削除)
(3) ;(セミコロン)を削除

正しくは、、、

.plus-icon::before{
   content: "\00ecf2";
}

である。

今回のフォントアイコンは、Fontello - icon fonts generator です。

改めて全てを書くと、、
HTML

<i class="plus-icon"></i>

CSS

@font-face{
   font-family: 'fontello';
   src: url('../font/fontello.eot');
   src: url('../font/fontello.eot#iefix') format('embedded-opentype'),
        url('../font/fontello.woff') format('woff'),
        url('../font/fontello.ttf') format('truetype'),
        url('../font/fontello.svg#fontello') format('svg');
   font-weight: normal;
   font-style: normal;
}
.plus-icon{
   font-family: "fontello";
   font-style: normal;
   font-weight: normal;
   font-size: 32px;
   display: inline-block;
   text-decoration: inherit;
   cursor: pointer;
   color: #606060;
   margin: 4px 4px;
}
.plus-icon::before{
   content: "\00ecf2";
}

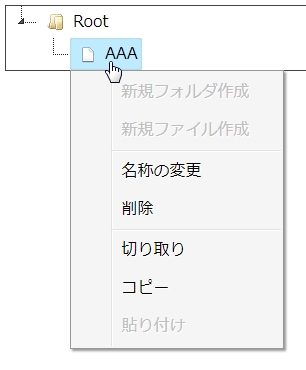
jsTree のコンテキストメニューをカスタマイズ

jsTree のプラグイン contextmenu は、デフォルトのままではフォルダとファイルのように、
ある種類のノードの配下にノードを作成することができない
  =ファイルの下に、フォルダ/ファイルは作れてはいけないはずだ。。
つまり、ツリー構造を作成できるのは、フォルダのみでファイルではない。
  ・・・当たり前の規則だが。。。
jsTree デフォルトの contextmenu をそのまま使うと全てに対して、
配下にノードを作成ができてしまう。
だから、フォルダとファイルのようなツリーでコンテキストメニューを用意する場合
、自分でカスタマイズして書いてあげないとならない。

contextmenu 書込みの準備、 "plugins":[ "contextmenu" ], を書いて、
次にコンテキストメニューの設定を書く。
フォルダとファイルの区別は、icon 属性で区別する制御にする。
ノードに任意属性種別を作っても、コピー操作の処理は、
jsTree のコア内部処理でとてもオーバーライドできるような代物ではなく、
任意属性の新しい規則を作ってコピー時にきちんとコピーされるように
するのは非常に厳しい。
→ よって、icon 属性でフォルダとファイルの区別制御をする。
初期データにも↓のとおり、"icon" を書く

$('#treediv').jstree({ 'core':{
      'data':[
         {   "id":1, "icon":"jstree-folder", "text":"Root",
            "children":[
               {   "id":2, "icon":"jstree-file", "text":"AAA" }
            ]
         }
      ],
      "check_callback" : true
   },
   "plugins":[ "contextmenu" ],
   // ここに、contextmenu のカスタマイズを書き込む
  }
});

"plugins":[ "contextmenu" ], の次に書くもの。

"contextmenu":{
   "items":function($node){
      return {
         "createFolder":{
            "separator_before": false,
            "separator_after": false,
            "label": "新規フォルダ作成",
            "_disabled": function(data){
                return $.jstree.reference(data.reference)
                .get_node(data.reference).icon != "jstree-folder";
            },
            "action": function(data){
               var inst = $.jstree.reference(data.reference),
                     obj = inst.get_node(data.reference);
               inst.create_node(obj, { text:'New Folder', 'icon':'jstree-folder' }
                                , "last", function(new_node){
                  try{
                     inst.edit(new_node);
                  }catch(ex){
                     setTimeout(function(){ inst.edit(new_node); },0);
                  }
               });
            }
         },
         "createFile":{
            "separator_before": false,
            "separator_after": false,
            "label": "新規ファイル作成",
            "_disabled": function(data){
               return $.jstree.reference(data.reference)
               .get_node(data.reference).icon != "jstree-folder";
            },
            "action": function(data){
               var inst = $.jstree.reference(data.reference), 
                     obj = inst.get_node(data.reference);
               inst.create_node(obj, { text:'New File', 'icon':'jstree-file' }
                                , "last", function(new_node){
                  try{
                     inst.edit(new_node);
                  }catch(ex){
                     setTimeout(function(){ inst.edit(new_node); },0);
                  }
               });
            }
         },
         "rename":{
            "separator_before": true,
            "separator_after": false,
            "label": "名称の変更",
            "_disabled": false,
            "action": function(data){
               var inst = $.jstree.reference(data.reference),
                     obj = inst.get_node(data.reference);
               inst.edit(obj);
            }
         },
         "remove":{
            "separator_before": false,
            "separator_after": false,
            "label": "削除",
            "_disabled": function(data){
               return $.jstree.reference(data.reference)
               .get_node(data.reference).parent == "#";
            },
            "action": function(data){
               var inst = $.jstree.reference(data.reference),
                           obj = inst.get_node(data.reference);
               if (inst.is_selected(obj)){
                  inst.delete_node(inst.get_selected());
               }else{
                  inst.delete_node(obj);
               }
            }
         },
         "cut":{
            "separator_before": true,
            "separator_after": false,
            "label": "切り取り",
            "_disabled": function(data){
               return $.jstree.reference(data.reference)
               .get_node(data.reference).parent == "#";
            },
            "action": function(data){
               var inst = $.jstree.reference(data.reference),
                     obj = inst.get_node(data.reference);
               if (inst.is_selected(obj)){
                  inst.cut(inst.get_top_selected());
               }else{
                  inst.cut(obj);
               }
            }
         },
         "copy":{
            "separator_before": false,
            "icon": false,
            "separator_after": false,
            "label": "コピー",
            "_disabled": function(data){
               return $.jstree.reference(data.reference)
               .get_node(data.reference).parent == "#";
            },
            "action": function(data){
               var inst = $.jstree.reference(data.reference),
                     obj = inst.get_node(data.reference);
               if (inst.is_selected(obj)){
                  inst.copy(inst.get_top_selected());
               }else{
                  inst.copy(obj);
               }
            }
         },
         "paste":{
            "separator_before": false,
            "separator_after": false,
            "label": "貼り付け",
            "icon": false,
            "_disabled": function(data){
               if ($.jstree.reference(data.reference)
                       .get_node(data.reference).icon != "jstree-folder") return true;
               return !$.jstree.reference(data.reference).can_paste();
            },
            "action": function(data){
               var inst = $.jstree.reference(data.reference),
                     obj = inst.get_node(data.reference);
               inst.paste(obj);
               console.log( obj );
            }
         }
      };
   }
}

f:id:posturan:20180923151147j:plain

jsTree 初期表示で全て展開表示

open_all というメソッドが用意されてるとのことだが、jsTree の マニュアルを見ても
どう呼び出すのか解りにくい。

loaded.jstree イベントにバインドして実行させるそうだ。

$('#tree').jstree({ 'core':{
      'data':[
            {"id":1, "icon":"jstree-folder", "text":"Root",
            "children":[
               {"id":2, "icon":"jstree-file", "text":"A" }.
               {"id":3, "icon":"jstree-file", "text":"B" }
            ]
         }
      ]
   }
}).on('loaded.jstree', function(){
     $(this).jstree('open_all');
});