Python dictionary → Java Map

Python dictionary を 標準出力してJavaでMap として読み込む。

先日書いたものの勢いにまかせて、、、

Python 標準出力→Java受け取り - Oboe吹きプログラマの黙示録

Javaからプロセス起動で実行するPython と文字列の受け渡し - Oboe吹きプログラマの黙示録

では、リストではなく、Pythonの dictionary を 標準出力してJavaでMap として読み込む。というのも、
Base64 エンコードで受け渡せば安定して実行できる、

先日書いた標準 IOをまとめた Python コードに、辞書をBase64エンコードして標準出力するメソッドを
追加する。

util ディレクトリに置く stdio.py

# -*- coding: UTF-8 -*-
from base64 import b64encode
class StdIO:
    # 標準入力
    # escape=True  : inputした文字をUnicode文字列に変換してリストにする
    #                標準入力=Unicode入力を想定(Javaプロセス標準出力から受信する場合はTrueにする)
    # escape=False : inputした文字を変換なしでリストにする。
    #                標準入力=通常
    def input(self, escape=True):
        inlist = []
        try:
            if escape:
                while True:
                    inp = input('')
                    if inp == '': break
                    inlist.append(inp.encode().decode('unicode-escape'))
            else:
                while True:
                    inp = input('')
                    if inp == '': break
                    inlist.append(inp)
        except EOFError:
            pass
        return inlist
    # リストを標準出力
    #   escape=True  : リスト要素をunicode-escape にエンコードして出力
    #   code : 出力する文字コード、デフォルト 'utf-8'  ユニコード指定は、'unicode-escape'
    def printList(self, list, base64=False, code='utf-8'):
        outlist = []
        if base64==True:
            for e in list:
                data = e.encode(code)
                outlist.append(b64encode(data).decode())
        else:
            for e in list:
                data = e.encode(code)
                outlist.append(data)
        print(outlist)
    # 辞書をBase64エンコードして標準出力
    def printDictionary(self, dict):
        o = {}
        for k, v in dict.items():
            o[b64encode(("%s" % k).encode('utf-8')).decode()] = b64encode(("%s" % v).encode('utf-8')).decode()
        print(o)

Javaからプロセス起動する Python
testdictout.py

# -*- coding: UTF-8 -*-
from util.stdio import StdIO

dict = { 'a':'A', 'b':'B', 10:100 , "A":"あ" }

stdio = StdIO()
stdio.printDictionary(dict)

Java のコード

import java.io.ByteArrayOutputStream;
import java.io.IOException;
import java.nio.charset.StandardCharsets;
import java.util.Base64;
import java.util.HashMap;
import java.util.Map;
import org.yipuran.function.ThrowableConsumer;
import org.yipuran.util.process.ScriptExecutor;
import com.google.gson.GsonBuilder;
import com.google.gson.reflect.TypeToken;
try(ByteArrayOutputStream out = new ByteArrayOutputStream()){
   ScriptExecutor.runStream(()->"python script/testdictout.py"
   , ThrowableConsumer.of(i->i.transferTo(out))
   , (t, e)->{
      System.out.println("stderr : " + t );
      e.printStackTrace();
   });
   String response = out.toString();

   System.out.println(response);
   // 解析

   System.out.println("====== Google gson による解析 =========");

   Map<String, String> getmap = new GsonBuilder().serializeNulls()
   .create().fromJson(response,  new TypeToken<Map<String, String>>(){}.getType());
   
   Map<String, String> map = getmap.entrySet().stream()
   .collect(()->new HashMap<String, String>()
         , (r, t)->r.put(new String(Base64.getDecoder().decode(t.getKey()), StandardCharsets.UTF_8)
                        , new String(Base64.getDecoder().decode(t.getValue()), StandardCharsets.UTF_8))
         , (r, u)->r.putAll(u));

   map.entrySet().stream().forEach(e->{
      System.out.println(e.getKey() + " : " + e.getValue());
   });

}catch(IOException ex){
   ex.printStackTrace();
}finally{
}

結果、、、、

{'YQ==': 'QQ==', 'Yg==': 'Qg==', 'MTA=': 'MTAw', 'QQ==': '44GC'}

====== Google gson による解析 =========
a : A
A : あ
b : B
10 : 100

でも、こんなことするのは、
大量のデータには効率悪いだろうな。。

Python 標準出力→Java受け取り

先日書いた中の Python 標準出力→Java受け取りは、
Javaからプロセス起動で実行するPython と文字列の受け渡し - Oboe吹きプログラマの黙示録
リストを長い正規表現で解析する方法でこれでは、ちょっと効率が悪そうで
汚いコードである。
b' ' などとPython に出力させるのでなく、いっそのこと
Base64 エンコードさせたリストを出力させて Java で読み込んだ方が
スマートで安全だ。

Python 側、util ディレクトリに配置する stdio.py は次のようにする。

# -*- coding: UTF-8 -*-
from base64 import b64encode
class StdIO:
    # 標準入力
    # escape=True  : inputした文字をUnicode文字列に変換してリストにする
    #                標準入力=Unicode入力を想定(Javaプロセス標準出力から受信する場合はTrueにする)
    # escape=False : inputした文字を変換なしでリストにする。
    #                標準入力=通常
    def input(self, escape=True):
        inlist = []
        try:
            if escape:
                while True:
                    inp = input('')
                    if inp == '': break
                    inlist.append(inp.encode().decode('unicode-escape'))
            else:
                while True:
                    inp = input('')
                    if inp == '': break
                    inlist.append(inp)
        except EOFError:
            pass
        return inlist
    # リストを標準出力
    #   escape=True  : リスト要素をunicode-escape にエンコードして出力
    #   code : 出力する文字コード、デフォルト 'utf-8'  ユニコード指定は、'unicode-escape'
    def printList(self, list, base64=False, code='utf-8'):
        outlist = []
        if base64==True:
            for e in list:
                data = e.encode(code)
                outlist.append(b64encode(data).decode())
        else:
            for e in list:
                data = e.encode(code)
                outlist.append(data)
        print(outlist)

Java が呼び出す Python のコード
sample.py

# -*- coding: UTF-8 -*-

from util.stdio import StdIO

stdio = StdIO()
list = stdio.input()
# Java に返すリストは、Base64 エンコードする
stdio.printList(list, True)

Javaのコード

import org.yipuran.csv4j.CSVParser;
import org.yipuran.function.ThrowableConsumer;
import org.yipuran.util.process.ScriptExecutor;
import com.google.gson.GsonBuilder;
import com.google.gson.reflect.TypeToken;

Python から受け取った文字列を以下3通りの方法で解析する。
・StringTokenizer での抽出
・org.yipuran.csv4j.CSVParser での抽出・・・1行のCSVとして解析させる方法
Google gson での抽出・・・JSONのリストとして解析させる方法

StringTokenizer または 1行CSVとして解析する方法は、誰でもすぐに思いつくが、
JSONのリストとして解析させる方法は、なかなか思いつかないであろう。

List<String> list = Arrays.asList("A", "B'B", "C\"", "'\"", "あいうえ1234");

try(ByteArrayOutputStream out = new ByteArrayOutputStream()){
   ScriptExecutor.runStream(()->"python sample.py"
   , ()->list.stream().map(e->Unicodes.encode(e) + "\n").collect(Collectors.toList())
   , ThrowableConsumer.of(i->i.transferTo(out))
   , (t, e)->{
      System.out.println("stderr : " + t );
      e.printStackTrace();
   });
   String response = out.toString();

   System.out.println(response);
   // 解析
   System.out.println("====== StringTokenizer による抽出 =========");

   List<String> list1 
   = Collections.list(new StringTokenizer(response.replaceAll("[\r\n]", ""), ","))
   .stream()
   .map(e->e.toString().replaceFirst("^(\\['| {0,1}')", "").replaceFirst("'\\]{0,1}$", ""))
   .map(e->new String(Base64.getDecoder().decode(e), StandardCharsets.UTF_8))
   .collect(Collectors.toList());

   list1.stream()
   .forEach(e->{
      System.out.println("[" + e+ "]");
   });

   System.out.println("====== org.yipuran.csv4j.CSVParser による抽出 =========");

   List<String> list2 
   = new CSVParser().tokenize(response.replaceAll("[\r\n\\[\\]]", ""))
   .stream()
   .map(e->e.replaceAll("'", ""))
   .map(e->new String(Base64.getDecoder().decode(e), StandardCharsets.UTF_8))
   .collect(Collectors.toList());

   list2.stream()
   .forEach(e->{
      System.out.println("[" + e+ "]");
   });

   System.out.println("====== Google gson による抽出 =========");

   List<String> list3 = new GsonBuilder().serializeNulls().create()
   .fromJson(response, new TypeToken<List<String>>(){}.getType());
   List<String> list4 = list3.stream()
   .map(e->new String(Base64.getDecoder().decode(e), StandardCharsets.UTF_8))
   .collect(Collectors.toList());

   list4.stream()
   .forEach(e->{
      System.out.println("[" + e+ "]");
   });
}catch(IOException ex){
   ex.printStackTrace();
}finally{
}

実行結果は、、、

['QQ==', 'QidC', 'QyI=', 'JyI=', '44GC44GE44GG44GIMTIzNA==']

====== StringTokenizer による抽出 =========
[A]
[B'B]
[C"]
['"]
[あいうえ1234]
====== org.yipuran.csv4j.CSVParser による抽出 =========
[A]
[B'B]
[C"]
['"]
[あいうえ1234]
====== Google gson による抽出 =========
[A]
[B'B]
[C"]
['"]
[あいうえ1234]

InputStream transferTo

先日の
oboe2uran.hatenablog.com

Java9 以上なら、
java.io.InputStream.transferTo(OutputStream out) throws IOException 使えば、

List<String> list;

// list に送信するものを入れてから

try(ByteArrayOutputStream out = new ByteArrayOutputStream()){
   ScriptExecutor.runStream(()->"python script/test.py"
   , ()->list.stream().map(e->Unicodes.encode(e) + "\n").collect(Collectors.toList())
   , ThrowableConsumer.of(i->i.transferTo(out))
   , (t, e)->{
      System.out.println("stderr : " + t );
      e.printStackTrace();
   });
   String response = out.toString();

}catch(IOException ex){
   ex.printStackTrace();
}finally{
}

Bootstrap 使用と併用するサイド(横)に設置するメニューナビゲーション

Webページデザインとして、サイド(横)に折りたたみするメニューをCSSだけで書いたことがある。
CSSだけでサイド開閉メニュー - Oboe吹きプログラマの黙示録
でもこれには、次の欠点がある。
・メニュー開いた時に、スライドする方法の為にブラウザ横スクロールが発生してしまう。
・メニュー開いても、メニュー範囲外のところは 半透明レイヤーを作ってるわけではないのでリンクなどそのまま押せてしまう。
やはりサイド(横)に設置した場合、開いた時にWebページ全体を半透明のレイヤで被せて
メニュー以外のところを押せないようにしないとUI として良くない。
昔から方法はいろいろ見かけてたが、どうも気に入らなかった。
BootStrap 使用することと、併用して使えるものを探していた。。
Git-hub に、
https://github.com/blivesta/drawer/
というシンプルに作られてるものを見つけた。

準備
CDN サイトで書くと。。。

<link href="https://stackpath.bootstrapcdn.com/bootstrap/4.1.3/css/bootstrap.min.css" rel="stylesheet">
<link href="https://cdnjs.cloudflare.com/ajax/libs/drawer/3.2.2/css/drawer.min.css" rel="stylesheet">
<script src="https://code.jquery.com/jquery-3.4.1.min.js"></script>
<script src="https://cdnjs.cloudflare.com/ajax/libs/iScroll/5.2.0/iscroll.min.js"></script>
<script src="https://cdnjs.cloudflare.com/ajax/libs/popper.js/1.15.0/umd/popper.min.js"></script>
<script src="https://stackpath.bootstrapcdn.com/bootstrap/4.1.3/js/bootstrap.min.js"></script>
<script src="https://cdnjs.cloudflare.com/ajax/libs/drawer/3.2.2/js/drawer.min.js"></script>

CSS
構築するページに合わせて、、

<style type="text/css">
body {
	background-color: #dbf4f0;
}
main {
	margin-top: 64px;
}
nav .dropdown-menu {
	border: none;
}

.drawer-menu a{
   color: #000000;
}
.drawer-menu a:hover{
   text-decoration: underline;
}
</style>

設置のJS

<script type="text/javascript">
$(function() {
      $('.drawer').drawer();
});
</script>

ページ body

<body>
   <div class="drawer drawer--left">
      <header role="banner">
         <button type="button" class="drawer-toggle drawer-hamburger">
            <span class="sr-only">toggle navigation</span>
            <span class="drawer-hamburger-icon"></span>
         </button>
         <nav class="drawer-nav" role="navigation">
            <ul class="drawer-menu">
               <li><a class="drawer-brand" href="#">メニュー</a></li>
               <li><a class="drawer-menu-item" href="#">リンク1</a></li>
               <li><a class="drawer-menu-item" href="#">リンク2</a></li>
               <li class="drawer-dropdown">
                   <a class="drawer-menu-item dropdown-toggle" data-target="#" href="#" role="button"
                       data-toggle="dropdown">グループ</a>
                   <ul class="dropdown-menu">
                      <li><a class="dropdown-item" href="#">Aaa</a></li>
                      <li><a class="dropdown-item" href="#">Bbb</a></li>
                      <li><a class="dropdown-item" href="#">Ccc</a></li>
                   </ul>
               </li>
            </ul>
         </nav>
      </header>
      <main role="main">
         <div class="container-fluid">
            <h1>Page content</h1>
            <div>
               <h3>https://github.com/blivesta/drawer/</h3>
            </div>
         </div>
      </main>
   </div>
</body>

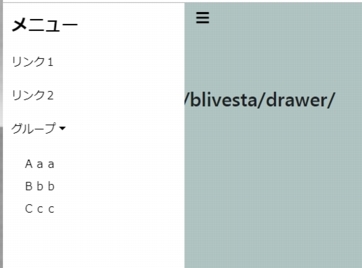
メニュー閉じてる時、
f:id:posturan:20190711235413j:plain

メニュー開く、
f:id:posturan:20190711235504j:plain

https://github.com/blivesta/drawer/ が配布しているのは、メニューの中の
ドロップダウンメニュー ul の class は、 drawer-dropdown-menu であるが、
これでは、jQuery 3.x系を使うと以下のエラーが発生する
 TypeError: Cannot read property 'setAttribute' of null
これを回避する為に、class="dropdown-menu" にする。

あるいは、<ul>-<li> を書かずに、divタグを書いて divタグ 内に、並べる

<li><a class="drawer-menu-item dropdown-toggle" href="#" role="button"
      data-toggle="dropdown">グループ</a>
   <div class="dropdown-menu">
      <a class="dropdown-item" href="#">Aaa</a>
      <a class="dropdown-item" href="#">Bbb</a>
      <a class="dropdown-item" href="#">Ccc</a>
   </div>
</li>

とするかになる。

メニュー開閉のアイコンを Fontawesome にしたければ、

<link href="https://use.fontawesome.com/releases/v5.6.3/css/all.css" rel="stylesheet">
   <div class="drawer drawer--left">
      <header role="banner">
         <button type="button" class="drawer-toggle drawer-hamburger">
            <i class="fa fa-bars fa-lg" aria-hidden="true"></i>
         </button>

で良いだろう。
この時、

button.drawer-toggle{
   padding: 10px;
}

を書いた方が良いかもしれない。
f:id:posturan:20190712000648j:plain
f:id:posturan:20190712000700j:plain

Javaからプロセス起動で実行するPython と文字列の受け渡し

Javaプログラムとプロセス起動したPython 間で標準入出力を介して文字列を受け渡しをする。
Python は内部処理の文字コードUnicode のせいか、
受け渡しの文字列は Unicode でなければ、双方で受け取れない。

Pythonスクリプトの用意
標準入出力実行は、メソッドとして処理をまとめておく

script/util/stdio.py

# -*- coding: UTF-8 -*-

class StdIO:
    def input(self, escape=True):
        inlist = []
        try:
            if escape:
                while True:
                    inp = input('')
                    if inp == '': break
                    inlist.append(inp.encode().decode('unicode-escape'))
            else:
                while True:
                    inp = input('')
                    if inp == '': break
                    inlist.append(inp)
        except EOFError:
            pass
        return inlist

    def printList(self, list, escape=True):
        if escape:
            outlist = []
            for e in list:
                data = e.encode('unicode-escape')
                outlist.append(data)
            print(outlist)
        else:
            print(list)

このinputメソッドは、

escape 処理
True inputした文字をUnicode文字列に変換してリストにする
False inputした文字を変換なしでリストにする。

printList は、リストを print する処理でパラメータ escape は同じ

Java からプロセス起動で実行するPythonスクリプト
scrpt/sample.py

# -*- coding: UTF-8 -*-

from util.stdio import StdIO

stdio = StdIO()
list = stdio.input()
stdio.printList(list)

Javaからの文字列を標準入力受信→リスト→標準出力
するだけの単純なエコーの処理

Java側の呼び出しプログラム
プロセス起動として
https://github.com/yipuran/yipuran-core/wiki/Script_exec
そ使用する。
また、throwable な Consumer を使用する。
https://github.com/yipuran/yipuran-core/blob/master/src/main/java/org/yipuran/function/ThrowableConsumer.java
Pythonから受信する文字列は、
b'' で括られてくるので解析に特別な処理が必要になる。

// Python に渡す文字列リスト
List<String> list = Arrays.asList("A", "B'B", "C\"", "'\"", "あいうえ1234");

try(ByteArrayOutputStream out = new ByteArrayOutputStream()){
   // script/sample.py を実行 Unicode エンコードして渡す。
   // Python標準出力の受け取りは、IOTransfer.exec(i, out) で、
   ScriptExecutor.runStream(()->"python script/sample.py"
   , ()->list.stream().map(e->Unicodes.encode(e) + "\n").collect(Collectors.toList())
   , ThrowableConsumer.of(i->IOTransfer.exec(i, out))
   , (t, e)->{
      System.out.println("stderr : " + t );
      e.printStackTrace();
   });
   String response = out.toString();

   System.out.println(response);
   System.out.println("===============");

   // 解析
   Unicodes unicodes = Unicodes.of();
   Pattern pattern = Pattern.compile(
"(b'(\\\\'|[ !#$%&\\(\\)\\*\\+,\\-\\./:;<=>?@\\[\\]^_`\\{\\|\\}\\w\\\\\"])+')
|(b\"[ !#$%&\\(\\)\\*\\+,\\-\\./:;<=>?@\\[\\]^_`\\{\\|\\}\\w\\\\']+\")|b''");
   pattern.matcher(response).results()
   .map(r->r.group())
   .map(e->e.substring(2, e.length()-1))
   .map(e->unicodes.parse(e))
   .map(e->e.replaceAll("\\\\'", "'"))
   .forEach(e->{
      System.out.println(   e );
   });

   System.out.println("===============");

}catch(IOException ex){
   ex.printStackTrace();
}finally{
}


IOTransfer.exec(i, out) は、よくある InputStream から OutputStream への
書き出しで、何度も同じような処理を書きたくないので
使い回しのメソッドにしたもの。
↓↓↓(interface にする必要はないが、、とりあえず)

import java.io.IOException;
import java.io.InputStream;
import java.io.OutputStream;
/**
 * IOTransfer
 */
public interface IOTransfer{
   public static void exec(InputStream in, OutputStream out) throws IOException{
      byte[] b = new byte[1024];
      int len;
      while((len=in.read(b, 0, b.length)) >= 0){
         out.write(b, 0, len);
      }
      out.flush();
      out.close();
   }
}

この実行結果の標準出力を見て判ることだが、
Python が標準出力した文字列は、b' ' で括られ、ASCII はそのまま、
2バイト文字は、\uXXXX の表現だが、'\' は、'\\' 2文字表現で
出力される。

[b'A', b"B'B", b'C"', b'\'"', b'\\u3042\\u3044\\u3046\\u30481234']

===============
A
B'B
C"
'"
あいうえ1234
===============

b"B'B" のように、シングルクォート1文字存在するときは、
ダブルクォートで括った b" " で、
シングルクォートとダブルクォート両方存在する場合は、
シングルクォートがエスケープされてくる。
これを正規表現で捕まえるのは結構たいへんで
以下、長い正規表現が必要だ。
\p{ASCII}であってシングルクォートとダブルクォートを除くという正規表現があれば
もっとスマートな正規表現になるであろうが、以下を java.util.regex.Pattern で
処理する。

(b'(\\'|[ !#$%&\(\)\*\+,\-\./:;<=>?@\[\]^_`\{\|\}\w\\"])+')|(b\"[ !#$%&\(\)\*\+,\-\./:;<=>?@\[\]^_`\{\|\}\w\\\']+\")|b''

正規表現だけでなく、
シングルクォートのエスケープが残ってしまうので、

 .map(e->e.replaceAll("\\\\'", "'"))

も必要であった。

b'\\u3042\\u3044\\u3046\\u30481234'
を捕捉後の UTF-8 への変換は、ASCII と ユニコード表現が混じっているので、
先日の Unicodesparse メソッドを使用する。

http://oboe2uran.hatenablog.com/entry/2019/07/02/215601

このように Java から プロセス起動で Python 実行して文字列を自由に渡し、
Python 実行結果として文字列を任意に受信認識できることは、
JavaPythonJava という流れを構成していく上で重要である。

IOTransfer なんて用意しなくても、Java9 以上なら、、、
oboe2uran.hatenablog.com

後日、、、、
以下の方が良いと思い投稿
↓↓↓↓↓↓↓↓↓↓↓↓↓↓↓↓↓↓


oboe2uran.hatenablog.com

Java8 で、Matcher の Stream

先日の Unicode 文字列ーUTF-8変換をする処理メソッドを整理
これを Java 8 でも動くようにするには、
2年前に書いた、MatchResult の Stream を使うしかないであろう。
oboe2uran.hatenablog.com

↑の MatcherStream を使用して、先日の Unicodes public String parse(String str) メソッドは、

public final class Unicodes{
   private static Pattern ptn2;
   private static Pattern ptn4;
   private Unicodes(){
      ptn2 = Pattern.compile("\\\\u[0-9a-fA-F]{4}");
      ptn4 = Pattern.compile("\\\\\\\\u[0-9a-fA-F]{4}");
   }


yipuran-core/MatcherStream.java at master · yipuran/yipuran-core · GitHub

import org.yipuran.regex.MatcherStream
   public String parse(String str){
      if (str==null || str.isEmpty()) return "";
      /* for Java 9
      String s = ptn4.matcher(str).replaceAll(m->
         new String(new int[]{ Integer.parseInt(m.group().substring(3), 16) }, 0, 1)
      );
      return ptn2.matcher(s).replaceAll(m->
         new String(new int[]{ Integer.parseInt(m.group().substring(2), 16) }, 0, 1)
      );
      /****************/
      AtomicReference<String> r = new AtomicReference<>(str);
      MatcherStream.findMatches(ptn4, str).forEach(e->{
         r.set(r.get().replace(e.group(), new String(new int[]{ Integer.parseInt(e.group().substring(3), 16) }, 0, 1)));
      });
      MatcherStream.findMatches(ptn2, str).forEach(e->{
         r.set(r.get().replace(e.group(), new String(new int[]{ Integer.parseInt(e.group().substring(2), 16) }, 0, 1)));
      });
      return r.get();
   }

とコードを書きなおして、Java 8 でコンパイルする。

Unicode 文字列ーUTF-8変換をする処理メソッドを整理する。(Javaで)

過去、Unicode 文字列を変換する処理を書いたが、

https://github.com/yipuran/yipuran-core/blob/master/src/main/java/org/yipuran/util/StringUtils.java

https://github.com/yipuran/yipuran-core/blob/master/src/main/java/org/yipuran/util/SJutil.java

http://oboe2uran.hatenablog.com/entry/2019/04/25/164759

http://oboe2uran.hatenablog.com/entry/2018/12/24/185040

http://oboe2uran.hatenablog.com/entry/2018/12/23/183835

少し効率が悪いのを反省して、処理を書き直すことにした。
Unicode以外の文字列が混ざってもうまく読み込めるものを作ることにした。

クラス名も改め、Unicodes である。

import java.util.regex.Pattern;
/**
 * Unicodes
 */
public final class Unicodes{
   private static Pattern ptn2;
   private static Pattern ptn4;
   private Unicodes(){
      ptn2 = Pattern.compile("\\\\u[0-9a-fA-F]{4}");
      ptn4 = Pattern.compile("\\\\\\\\u[0-9a-fA-F]{4}");
   }
   public static Unicodes of(){
      return new Unicodes();
   }
   /**
    * Unicode文字列に変換する("あ" → "\u3042")
    */
   public static String encode(String string){
      if (string == null || string.isEmpty()) return "";
      StringBuilder sb = new StringBuilder();
      for(int i=0; i < string.length(); i++){
         sb.append(String.format("\\u%04X", Character.codePointAt(string, i)));
      }
      return sb.toString();
   }
   /**
    * Unicode文字列→UTF-8
    */
   public static String decode(String unicode){
      if (unicode == null || unicode.isEmpty()) return "";
      String[] cs = unicode.split("\\\\u");
      int[] cp = new int[cs.length - 1];
      for(int i=0;i < cp.length; i++){
         cp[i] = Integer.parseInt(cs[i + 1], 16);
      }
      return new String(cp, 0, cp.length);
   }
   /**
    * 1文字だけのUnicode文字→UTF-8
    */
   public String character(String unicode){
      if (unicode==null || unicode.isEmpty()) return "";
      if (ptn4.matcher(unicode).matches()){
         return new String(new int[]{ Integer.parseInt(unicode.substring(3), 16) }, 0, 1);
      }else if(ptn2.matcher(unicode).matches()){
         return new String(new int[]{ Integer.parseInt(unicode.substring(2), 16) }, 0, 1);
      }else{
         return unicode;
      }
   }

   /**
    * Unicode表現+Unicode以外表現の混在文字列→UTF-8
    */
   public String parse(String str){
      if (str==null || str.isEmpty()) return "";
      String s = ptn4.matcher(str).replaceAll(m->
         new String(new int[]{ Integer.parseInt(m.group().substring(3), 16) }, 0, 1)
      );
      return ptn2.matcher(s).replaceAll(m->
         new String(new int[]{ Integer.parseInt(m.group().substring(2), 16) }, 0, 1)
      );
   }
}

これは、Java9 から採用された正規表現の一括置換、
java.util.regex.Matcher 

String replaceAll(Function<MatchResult, String> replacer)

を使っているので、Java9 以上の環境でなければダメだ。

簡単なテストコード

String s0 = "\u3042";
System.out.println(s0);
System.out.println(Unicodes.of().character(s0));

String s1 = "\\u3042";
System.out.println(s1);
System.out.println(Unicodes.of().character(s1));

String s2 = "\\\\u3042";
System.out.println(s2);
System.out.println(Unicodes.of().character(s2));

String ustr = Unicodes.encode("あいうabc123()+=%");

System.out.println(ustr);
System.out.println(Unicodes.decode(ustr));

/*  _あ_い_う_+_=_あ_い_う_ の文字列 */
String str = "_\\\\u3042_\\\\u3044_\\\\u3046_\\\\uff0b_\\\\uFF1D_\\u3042_\\u3044_\u3046_";

System.out.println(str);
System.out.println(Unicodes.of().parse(str));

結果

あ
あ
\u3042
あ
\\u3042
あ
\u3042\u3044\u3046\u0061\u0062\u0063\u0031\u0032\u0033\u0028\u0029\uFF0B\uFF1D\uFF05
あいうabc123()+=%
_\\u3042_\\u3044_\\u3046_\\uff0b_\\uFF1D_\u3042_\u3044_う_
_あ_い_う_+_=_あ_い_う_