ListView で CheckedTextView 以外の方法で選択行を自由に表現したいケースは
たくさんある。
android.widget.Checkable 実装のカスタマイズビューで、タップ時だけでなく、選択状態の場合に、、
背景を指定したい。
但し、ここで書くサンプル・パターンはポイントを押さえる為で単純なデザインのみであり、
実践は複雑なデザインが目的である。
単純なデザインなら、他の方法を使うべきである。
res/vaules/attrs.xml を用意する。
<?xml version="1.0" encoding="utf-8"?>
<resources>
<declare-styleable name="CheckableLinearLayout">
<attr name="selectedBackgroundColor" format="color" />
<attr name="defaultBackgroundColor" format="color" />
</declare-styleable>
</resources>
LinearLayout を継承して、android.widget.Checkable をインターフエースとして実装する
選択用の行レイアウトを作る → yip.yip.CheckableLinearLayout
package yip.yip;
import android.content.Context;
import android.content.res.TypedArray;
import android.util.AttributeSet;
import android.widget.Checkable;
import android.widget.LinearLayout;
/**
* CheckableLinearLayout
*/
public class CheckableLinearLayout extends LinearLayout implements Checkable{
private boolean mChecked;
private int mSelectedBackgroundColor;
private int mDefaultBackgroundColor;
public CheckableLinearLayout(Context context, AttributeSet attrs) {
super(context, attrs, 0);
TypedArray array = context.obtainStyledAttributes(attrs, R.styleable.CheckableLinearLayout, 0, 0);
mSelectedBackgroundColor = array.getColor(R.styleable.CheckableLinearLayout_selectedBackgroundColor, 0xff33b5e5 );
mDefaultBackgroundColor = array.getColor(R.styleable.CheckableLinearLayout_defaultBackgroundColor, 0xff222222 );
array.recycle();
}
@Override
public boolean isChecked(){
return mChecked;
}
@Override
public void setChecked(boolean checked){
mChecked = checked;
setBackgroundColor(checked ? mSelectedBackgroundColor : mDefaultBackgroundColor);
refreshDrawableState();
}
@Override
public void toggle(){
mChecked = !mChecked;
}
}
使用例
res/layout/sample_row.xml
<yip.yip.CheckableLinearLayout xmlns:android="http://schemas.android.com/apk/res/android"
xmlns:app="http://schemas.android.com/apk/res/yip.yip.app.sample"
android:layout_width="match_parent"
android:layout_height="match_parent"
app:selectedBackgroundColor="#c73650"
app:defaultBackgroundColor="#444444"
android:orientation="horizontal" >
<TextView
android:id="@+id/text1"
android:layout_width="wrap_content"
android:layout_height="wrap_content"
android:layout_gravity="center_vertical"
android:layout_margin="16dp"
android:textAppearance="?android:attr/textAppearanceMedium" />
</yip.yip.CheckableLinearLayout>
ArrayAdapterの getView だけオーバーライドする
final TextView textView = (TextView)findViewById(R.id.textView1);
final ListView listview = (ListView)findViewById(R.id.listView1);
listview.setAdapter(new ArrayAdapter<Item>(this, 0, mlist){
LayoutInflater inflater = (LayoutInflater)getSystemService(Context.LAYOUT_INFLATER_SERVICE);
@Override
public View getView(int position,View convertView,ViewGroup parent){
View view = convertView==null ? inflater.inflate(R.layout.sample_row, null) : convertView;
TextView tv = (TextView)view.findViewById(R.id.text1);
Item item = mlist.get(position);
tv.setText(item.name);
return view;
}
});
listview.setChoiceMode(AbsListView.CHOICE_MODE_SINGLE);
listview.setOnItemClickListener(new AdapterView.OnItemClickListener(){
@Override
public void onItemClick(AdapterView<?> parent, View view, int position, long id){
// 選択後の処理など。。。
BaseAdapter adapter = (BaseAdapter)parent.getAdapter();
Item item = (Item)adapter.getItem(position);
textView.setText(item.name);
mSelectedPosition = position;
}
});
画面のレイアウト
<?xml version="1.0" encoding="utf-8"?>
<LinearLayout xmlns:android="http://schemas.android.com/apk/res/android"
android:layout_width="match_parent"
android:layout_height="match_parent"
android:orientation="vertical" >
<TextView
android:id="@+id/textView1"
android:layout_width="match_parent"
android:layout_height="wrap_content"
android:background="#ffffff"
android:padding="10dp"
android:textAppearance="?android:attr/textAppearanceMedium"
android:textColor="#000000" />
<ListView
android:id="@+id/listView1"
android:layout_width="match_parent"
android:layout_height="match_parent"
android:layout_weight="1" >
</ListView>
<LinearLayout
android:layout_width="match_parent"
android:layout_height="wrap_content"
android:orientation="horizontal" >
<Button
android:id="@+id/statusButton"
android:layout_width="match_parent"
android:layout_height="wrap_content"
android:layout_weight="1"
android:text="status" />
<Button
android:id="@+id/backButton"
android:layout_width="match_parent"
android:layout_height="wrap_content"
android:layout_weight="1"
android:text="BACK" />
</LinearLayout>
</LinearLayout>
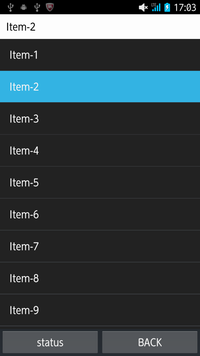
画面は、、、

デフォルトの色では、、
